Tuesday, August 19, 2008

Tip: Set Gmail as your default email client in Firefox 3


For those of you using newly released Firefox 3, or willing to give it a try, you can take advantage of a new feature that lets you set Gmail as the default for all email links -- those that contain "mailto:" in them. If you're like me and don't have a default email client set up, then clicking these links typically launches an installation wizard for a destkop mail client, or opens some email software that you don't actually use.

Now you can configure Firefox to launch Gmail when you click on email address links and avoid the hassle. The folks over at Lifehacker published these tips on how to set it up:

1) Go to Gmail and sign in.

2) While in Gmail, copy and paste the following into your browser's address bar and hit enter.

javascript:window.navigator.registerProtocolHandler("mailto","https://
mail.google.com/mail/?extsrc=mailto&url=%s","Gmail")


Google Apps users can use this code (but be sure to replace yourdomain.com with your Google Apps domain name):

javascript:window.navigator.registerProtocolHandler("mailto","https://
mail.google.com/a/yourdomain.com/mail/?extsrc=mailto&url=%s","Gmail")


3) Click "Add Application" when you are prompted1. Congrats, you just added Gmail to your browser's list of mail clients.


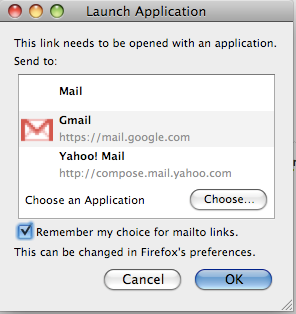
4) To set Gmail as your default, click on this link and you will be prompted with a dialog box listing available email applications. By selecting Gmail and checking "Remember my choice for mailto links" you won't have to tell your browser again. (You don't actually need to send an email after you click that link.)


You can always change this setting by going into "Tools" > "Options" (or "Firefox" > "Preferences," for Mac users) selecting "Applications" and going to the "mailto" option. There's a drop down next to the option that lets you change your default. Clicking "Application details" will take you to a settings page where you can completely remove Gmail or other mail apps.


1If nothing happens when you type in the code, double check that you copied the entire snippet correctly, and if nothing happens, you probably changed an advanced setting (maybe without even knowing) and need to set it back to default. To do it, type about:config into your browser and make sure that network.protocol-handler.external.mailto is on the default setting: true.


View Original Article

Blogged with the Flock Browser

Chat with your Gmail contacts on the iPhone


Last week, we launched a new version of Google Talk designed specifically for the iPhone. It works right in your Safari browser, so there's no need to download or install anything -- just go to talk.google.com and sign in.*

Because this version of Talk is designed to run in your browser, you'll be automatically signed out of Talk when you navigate to a different browser window or iPhone app. So while it's not a traditional "always-on" instant message client, it's useful for changing your status message on the go or checking in to see if someone's online and sending them a quick chat. It's equally nice for killing time at the airport.

*Google Apps users: visit http://talkgadget.google.com/a/your-domain.com/talkgadget/m from your iPhone's browser, but be sure to replace 'your-domain.com' with your actual domain name.


View Original Article

Blogged with the Flock Browser

Monday, August 18, 2008

Convert DVD to iPhone

iSkysoft DVD to iPhone Converter is a professional Windows DVD to iPhone conversion program. Converting your DVDs to iPhone with this easy used software is just a few simple steps:


Step 1: Add DVD Movie


Click the Load DVD button, browse your computer, find the DVD folder of the movie you want to add from your hard disc or DVD-ROM, open your DVD folder, select the VIDEO_TS folder and click OK.

Or, click the Load IFO button, browse your computer, find the DVD folder of the movie you want to add from your hard disc or DVD-ROM, open your DVD folder, open the VIDEO_TS folder, select all the IFO files and click OK.

After you add your movie, you can choose any titles or chapters that you want to convert by ticking the check boxes before them.


Step 2: Output Settings


At the bottom of the main window, you can name the output file for the current title/chapter, and select a subtitle to put on your movie, select an audio track. Then finish all the settings including selecting an output format, clicking the Settings button to set the video and audio encoding settings, choose if to merge the selected titles or chapters into one file, and set an output directory to save the output files.


Step 3: Start Conversion


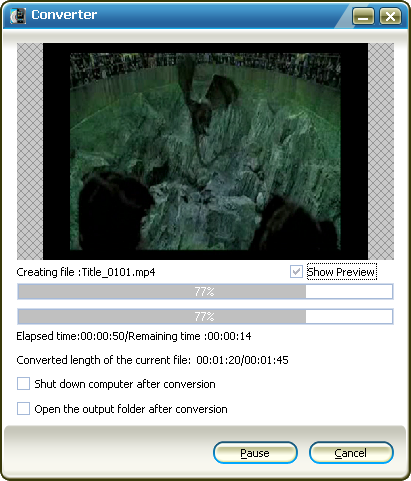
After setting the output settings, you can just click the Convert button to start converting your Movie. You can choose to shut down your computer or open the output folder after conversion so you don’t have to sit before your computer waiting for the conversion to finish.

Advanced Options


If you want to edit your movie before converting it, iSkysoft DVD to MP4 Converter for Mac provides your with various powerful functions including:


1. Trim DVD Title or Chapter


If you want to capture a clip from the current title/chapter, you can click the Trim button to open the Trim window and trim the current title or chapter by dragging the Start Time slider to set the start time, and dragging the End Time slider to set the finish time.


2. Crop DVD Video


If you want to remove the black edges or just convert an area from your movie video, you can click the Crop button to crop the video of the current title or chapter. You can specify an area

either by dragging the frame around the video or setting the crop values: Top, Button, Left and Right.


3. Video Effect


If you want to adjust the video effect of your movie, you can click the Effect button and drag each effect adjustment slider to set the video brightness, contrast, saturation and video volume. You can also choose a special effect from the Effect drop-down list to apply to your movie.


DVD to iPhone

View Original Article

Blogged with the Flock Browser

Saturday, August 16, 2008

Great Review Site For iPhone Apps

I came across AppVee this evening, a new site that is creating written and video reviews of iPhone apps. We continue to write about iPhone applications that we find interesting and include them in Crunchbase, but we aren’t doing the kind of in-depth, categorized reviews that AppVee is taking the time to create.


AppVee rates each application based on a variety of factors depending on the type of app. For entertainment applications, for example, apps are rated on ease of use, features, frequency of use, interface and usefulness. User ratings are also collected and placed alongside the official AppVee review.


The most useful part of the site are the overview videos, which allow you to get an idea of what the app is before you download it. If you’re an iPhone fanatic, bookmark the site, you’ll use it.


See AppStoreApps as well.


Crunch Network: MobileCrunch Mobile Gadgets and Applications, Delivered Daily.


View Original Article

Blogged with the Flock Browser

Flock and the New Facebook

Hi Folks,


As many of you Facebook users may know, Facebook is in the process of rolling out some pretty dramatic changes to their website.  They have been kind enough to make most of their changes available prior to

release for testing, but of course some things change along the way. Fortunately, to make your experience with transitioning to the new pages as seamless as possible, we've been able to make several updates to Flock before the new design is even generally available.


Nevertheless, we know of two issues with the new Facebook that we're still actively working to address.  The first is that you can't update your Facebook status through Flock's people sidebar when using the new Facebook.  Secondly, we're in the process of tweaking how Flock's drag-n-drop works with Facebook's overhaul of their Wall feature. 


We hope to have fixes rolled out in the next week or so.  Thanks in advance for your patience and keep on Flocking!


Mike


Blogged with the Flock Browser


View Original Article

Blogged with the Flock Browser